Regenerating plant, human and ecosystem health through nuturing the soil microbiome.
SOIL ANALYSIS
DIY Sampling for a Soil Biology Analysis
A lab tech can visit to map out your site, randomize the plants to collect from, and collect the samples. This might be helpful if you have a complex growing situation or if you find the sampling process intimidating (it’s not as difficult as it sounds!). The other option is to DIY. Links to helpful videos are included below, but it is not necessary to watch them, following these step by step instructions will be enough.
WHERE TO SAMPLE
Your lab tech will chat with you about your goals and establish a sampling strategy for you. Don’t sweat this part, individualized written instructions on how to do it are included in the analysis fee.
You will learn how to :
Quickly scribble out a map of your sampling area, defining what is in/out of the sampling boundary. If you want more information, check out our video below:
Play Video
Randomise the plants that you will be sampling from (at least 3), so we get our best chance at representing the “average” conditions of your soil. This is further explained here in our video:
Play Video
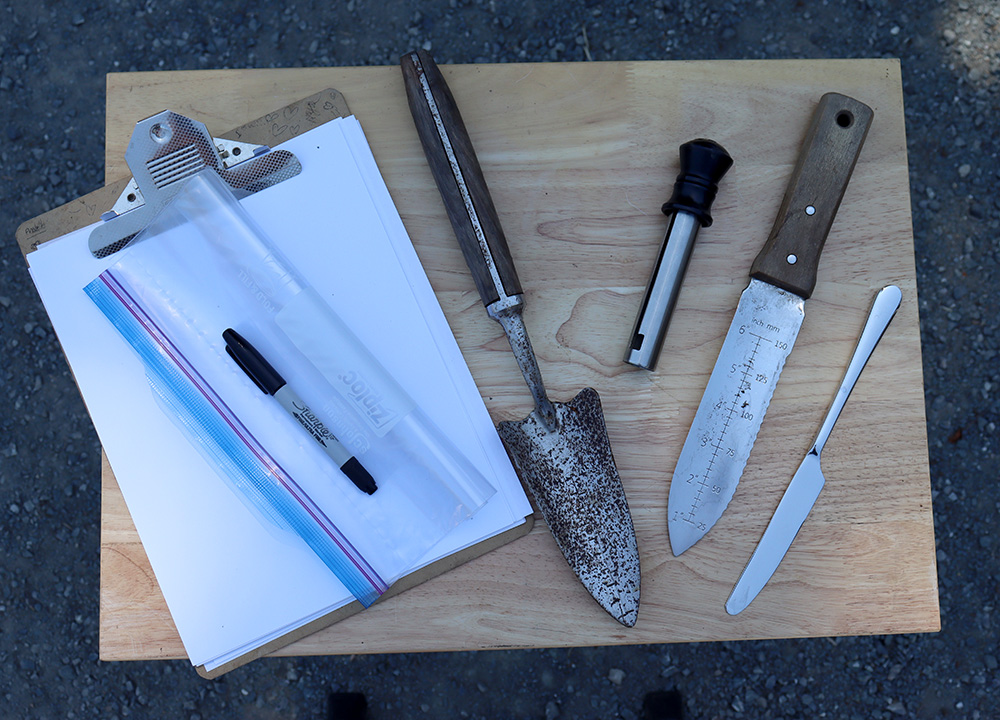
SAMPLING EQUIPMENT
You will need:
1. A tool that will allow you to take a core that is about 7.5cm (3 inches) deep and about 2 cm (3/4 inch) wide, for example a thin gardening trowel, hori hori gardening knife, apple corer, even a kitchen knife would work.
2. Clean ziplock bag/s or glass jars
3. A marker to label the bags
4. Your map
On the day that has been mutually agreed for sample drop-off, the goal is to get the sample to the lab as soon as possible after collection. Watch these videos below to learn more:
Play Video
Play Video
COLLECTING THE SAMPLE
If you are sampling around plants, you will typically take 3 soil “cores” from around each of the 3 plants that were randomly selected.
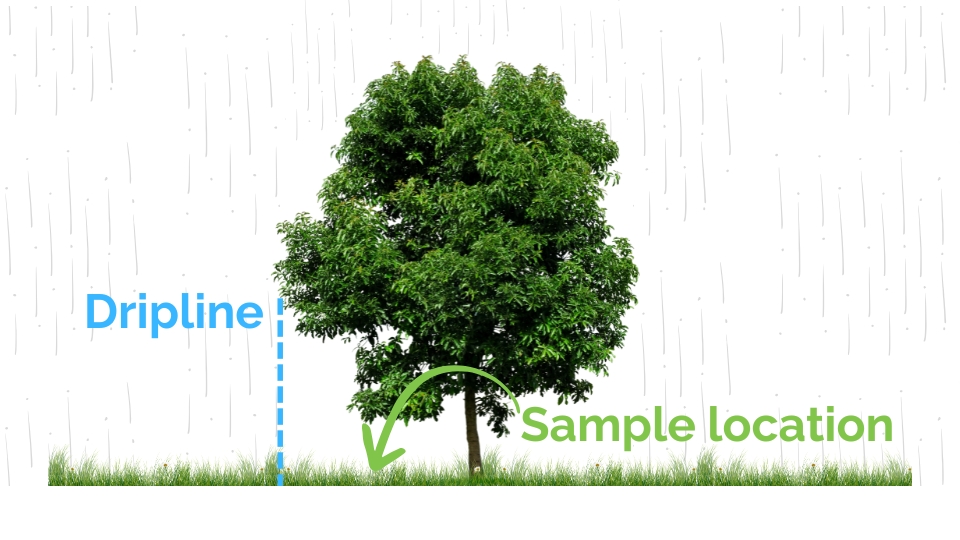
STEP 1
Find the position that is half way between the stem and the dripline of the plant.
STEP 2
Gently scrape off any undecomposed organic matter or plant material until you reach the soil surface (use a tool for this, not your hands). See this video for a demonstration:
Play Video
STEP 3
Take your soil core without touching it with your hands, and place it in a clean ziplock bag. Repeat twice more until you have all three cores from that same plant. Now go to the other two plants that were randomly selected and do the same thing. You will be placing all 9 soil cores into the same bag, unless discussed otherwise. See this video for a demonstration:
Play Video
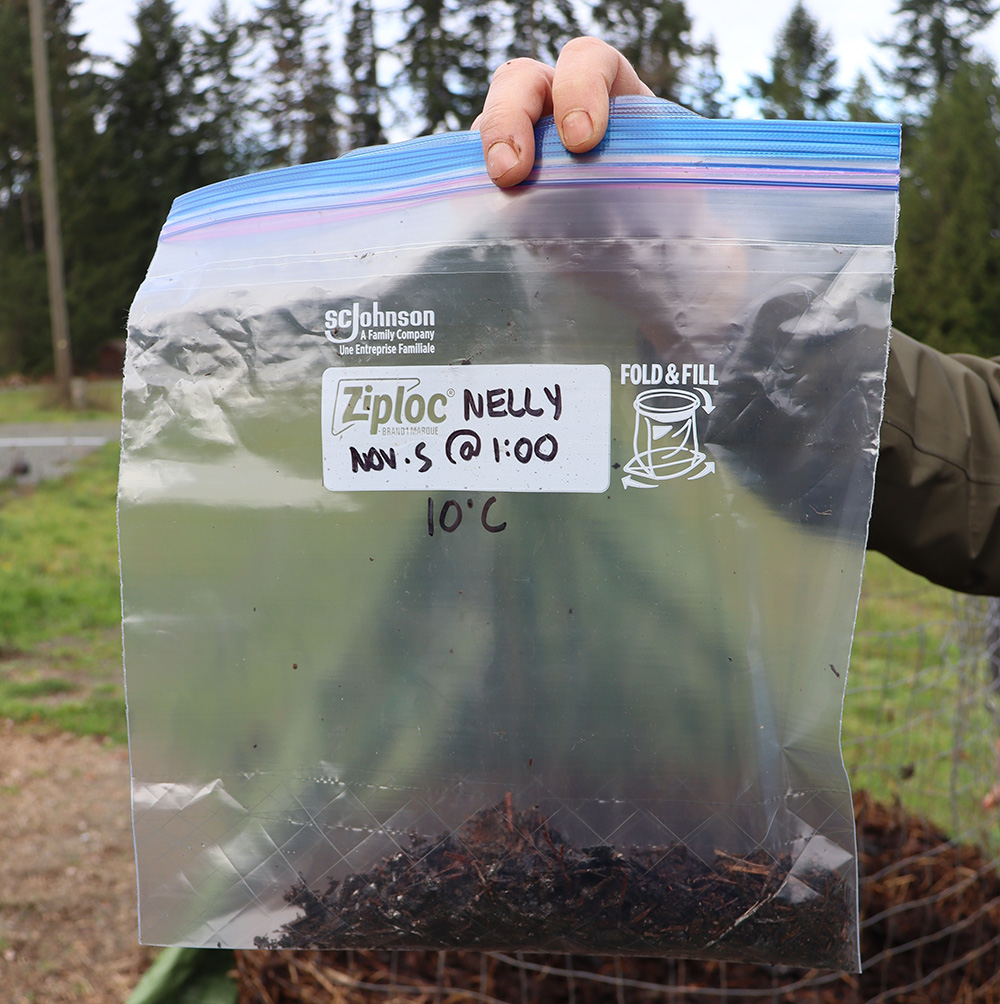
STEP 4
Label the bag with the following: 1. Your name or your farm name
2. Date and time of collection
3. The sample name
4. Ambient temperature when collected
5. The crop you want to grow
FOR BARE SOIL COLLECTION
If you are sampling bare soil, you will typically take 5 soil cores, one from the middle of each of 5 randomly selected grid squares on your map. Follow the above from step 2 onward.
TRANSPORTING THE SAMPLE
The key to getting results that are representative of what is actually happening in your soil is to try to keep the sample bag in the same conditions as the soil itself. This means maintaining:
Air – Don’t fill the bag any more than 1/3 full, and leave the ziplock open so the microbes can breathe.
Moisture – If you must leave the bag for some time before dropping it off, make sure it is not stored anywhere that could cause it to dry out or be rained on.
Temperature – Keep the sample at the same temperature as the soil. If it is cold out, don’t bring it inside. The best thing to do is leave it in a shady spot in ambient temperatures outside. Never put your sample in the fridge or freezer (unless those are the soil conditions you are sampling in!)
For more details about transporting your sample please watch this video:
"Amy has great passion and knowledge of soil health. Her analysis of my soil and compost biology pointed me in a new direction for soil fertility, plant health, and weed suppression. Thanks Amy!"